What is Redis?
Redis is an in-memory data structure store that can be used as a caching engine. Since it keeps data in RAM, Redis can deliver it very quickly. Redis is not the only product that we can use for caching. Memcached is another popular in-memory caching system, but many people agree that Redis is superior to Memcached in most circumstances. Personally, we like how easy it is to set up and use Redis for other purposes such as Redis Queue.
Getting Started
We have created an example application to introduce you to the concept of caching. Our application uses:
Install the App
Before you clone the repository, install virtualenvwrapper, if you don’t already have it. This is a tool that lets you install the specific Python dependencies that your project needs, allowing you to target the versions and libraries required by your app in isolation.
Next, change directories to where you keep projects and clone the example app repository. Once done, change directories to the cloned repository, and then make a new virtual environment for the example app using the
mkvirtualenv command:$ mkvirtualenv django-redis
(django-redis)$
NOTE: Creating a virtual environment withmkvirtualenvalso activates it.
Install all of the required Python dependencies with
pip, and then checkout the following tag:(django-redis)$ git checkout tags/1
Finish setting up the example app by building the database and populating it with sample data. Make sure to create a superuser too, so that you can log into the admin site. Follow the code examples below and then try running the app to make sure it is working correctly. Visit the admin page in the browser to confirm that the data has been properly loaded.
(django-redis)$ python manage.py makemigrations cookbook
(django-redis)$ python manage.py migrate
(django-redis)$ python manage.py createsuperuser
(django-redis)$ python manage.py loaddata cookbook/fixtures/cookbook.json
(django-redis)$ python manage.py runserver
Once you have the Django app running, move onto the Redis installation.
Install Redis
Download and install Redis using the instructions provided in the documentation. Alternatively, you can install Redis using a package manager such as apt-get or homebrewdepending on your OS.
Run the Redis server from a new terminal window.
$ redis-server
Next, start up the Redis command-line interface (CLI) in a different terminal window and test that it connects to the Redis server. We will be using the Redis CLI to inspect the keys that we add to the cache.
$ redis-cli ping
PONG
Redis provides an API with various commands that a developer can use to act on the data store. Django uses django-redis to execute commands in Redis.
Looking at our example app in a text editor, we can see the Redis configuration in the settings.py file. We define a default cache with the
CACHES setting, using a built-in django-redis cache as our backend. Redis runs on port 6379 by default, and we point to that location in our setting. One last thing to mention is that django-redis appends key names with a prefix and a version to help distinguish similar keys. In this case, we have defined the prefix to be “example”.CACHES = {
"default": {
"BACKEND": "django_redis.cache.RedisCache",
"LOCATION": "redis://127.0.0.1:6379/1",
"OPTIONS": {
"CLIENT_CLASS": "django_redis.client.DefaultClient"
},
"KEY_PREFIX": "example"
}
}
NOTE: Although we have configured the cache backend, none of the view functions have implemented caching.
App Performance
As we mentioned at the beginning of this tutorial, everything that the server does to process a request slows the application load time. The processing overhead of running business logic and rendering templates can be significant. Network latency affects the time it takes to query a database. These factors come into play every time a client sends an HTTP request to the server. When users are initiating many requests per second, the effects on performance become noticeable as the server works to process them all.
When we implement caching, we let the server process a request once and then we store it in our cache. As requests for the same URL are received by our application, the server pulls the results from the cache instead of processing them anew each time. Typically, we set a time to live on the cached results, so that the data can be periodically refreshed, which is an important step to implement in order to avoid serving stale data.
You should consider caching the result of a request when the following cases are true:
- rendering the page involves a lot of database queries and/or business logic,
- the page is visited frequently by your users,
- the data is the same for every user,
- and the data does not change often.
Start by Measuring Performance
Begin by testing the speed of each page in your application by benchmarking how quickly your application returns a response after receiving a request.
To achieve this, we’ll be blasting each page with a burst of requests using loadtest, an HTTP load generator, and then paying close attention to the request rate. Visit the link above to install. Once installed, test the results against the
/cookbook/ URL path:$ loadtest -n 100 -k http://localhost:8000/cookbook/
Notice that we are processing about 16 requests per second:
Requests per second: 16
When we look at what the code is doing, we can make decisions on how to make changes to improve the performance. The application makes 3 network calls to a database with each request to
/cookbook/, and it takes time for each call to open a connection and execute a query. Visit the /cookbook/ URL in your browser and expand the Django Debug Toolbar tab to confirm this behavior. Find the menu labeled “SQL” and read the number of queries: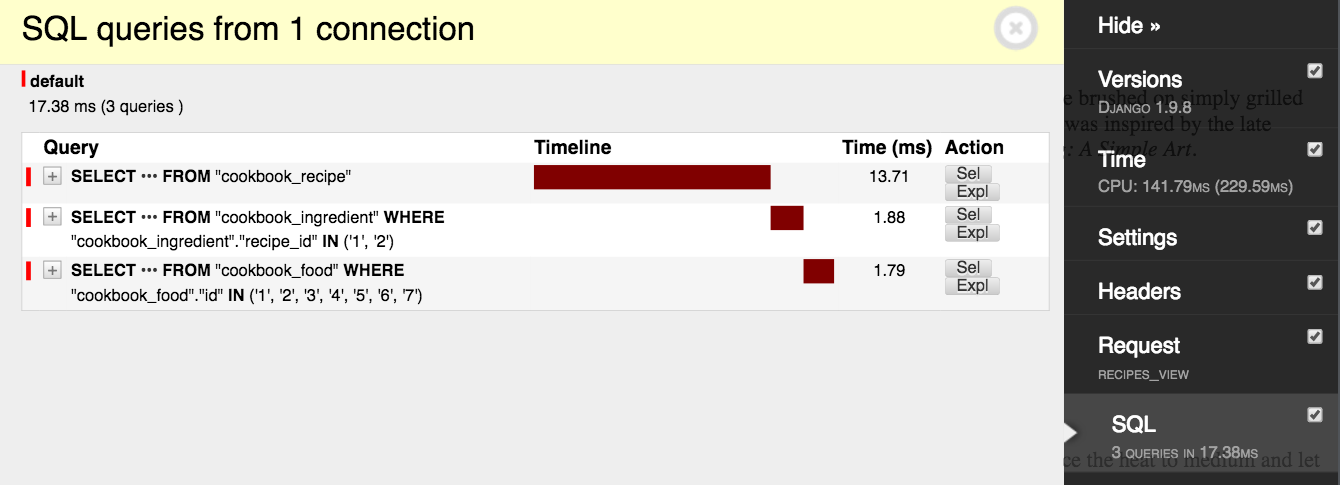
cookbook/services.py
from cookbook.models import Recipe


def get_recipes():
    # Queries 3 tables: cookbook_recipe, cookbook_ingredient,
    # and cookbook_food.
    return list(Recipe.objects.prefetch_related('ingredient_set__food'))
cookbook/views.py
from django.shortcuts import render
from cookbook.services import get_recipes


def recipes_view(request):
    return render(request, 'cookbook/recipes.html', {
        'recipes': get_recipes()
    })
The application also renders a template with some potentially expensive logic.
<html>
<head>
  <title>Recipes</title>
</head>
<body>
{% for recipe in recipes %}
  <h1>{{ recipe.name }}</h1>
    <p>{{ recipe.desc }}</p>
  <h2>Ingredients</h2>
  <ul>
    {% for ingredient in recipe.ingredient_set.all %}
    <li>{{ ingredient.desc }}</li>
    {% endfor %}
  </ul>
  <h2>Instructions</h2>
    <p>{{ recipe.instructions }}</p>
{% endfor %}
</body>
</html>
Implement Caching
Imagine the total number of network calls that our application will make as users start to visit our site. If 1,000 users hit the API that retrieves cookbook recipes, then our application will query the database 3,000 times and a new template will be rendered with each request. That number only grows as our application scales. Luckily, this view is a great candidate for caching. The recipes in a cookbook rarely change, if ever. Also, since viewing cookbooks is the central theme of the app, the API retrieving the recipes is guaranteed to be called frequently.
In the example below, we modify the view function to use caching. When the function runs, it checks if the view key is in the cache. If the key exists, then the app retrieves the data from the cache and returns it. If not, Django queries the database and then stashes the result in the cache with the view key. The first time this function is run, Django will query the database and render the template, and then will also make a network call to Redis to store the data in the cache. Each subsequent call to the function will completely bypass the database and business logic and will query the Redis cache.
example/settings.py
# Cache time to live is 15 minutes.
CACHE_TTL = 60 * 15
cookbook/views.py
from django.conf import settings
from django.core.cache.backends.base import DEFAULT_TIMEOUT
from django.shortcuts import render
from django.views.decorators.cache import cache_page
from cookbook.services import get_recipes

CACHE_TTL = getattr(settings, 'CACHE_TTL', DEFAULT_TIMEOUT)


@cache_page(CACHE_TTL)
def recipes_view(request):
    return render(request, 'cookbook/recipes.html', {
        'recipes': get_recipes()
    })
Notice that we have added the
@cache_page() decorator to the view function, along with a time to live. Visit the /cookbook/ URL again and examine the Django Debug Toolbar. We see that 3 database queries are made and 3 calls are made to the cache in order to check for the key and then to save it. Django saves two keys (1 key for the header and 1 key for the rendered page content). Reload the page and observe how the page activity changes. The second time around, 0 calls are made to the database and 2 calls are made to the cache. Our page is now being served from the cache!
When we re-run our performance tests, we see that our application is loading faster.
$ loadtest -n 100 -k http://localhost:8000/cookbook/
Caching improved the total load, and we are now resolving 21 requests per second, which is 5 more than our baseline:
Requests per second: 21
Inspecting Redis with the CLI
At this point we can use the Redis CLI to look at what gets stored on the Redis server. In the Redis command-line, enter the
keys * command, which returns all keys matching any pattern. You should see a key called “example:1:views.decorators.cache.cache_page”. Remember, “example” is our key prefix, “1” is the version, and “views.decorators.cache.cache_page” is the name that Django gives the key. Copy the key name and enter it with the get command. You should see the rendered HTML string.$ redis-cli -n 1
127.0.0.1:6379[1]> keys *
1) "example:1:views.decorators.cache.cache_header"
2) "example:1:views.decorators.cache.cache_page"
127.0.0.1:6379[1]> get "example:1:views.decorators.cache.cache_page"
NOTE: Run theflushallcommand on the Redis CLI to clear all of the keys from the data store. Then, you can run through the steps in this tutorial again without having to wait for the cache to expire.
Wrap-up
Processing HTTP requests is costly, and that cost adds up as your application grows in popularity. In some instances, you can greatly reduce the amount of processing your server does by implementing caching. This tutorial touched on the basics of caching in Django with Redis, but it only skimmed the surface of a complex topic.
Implementing caching in a robust application has many pitfalls and gotchas. Controlling what gets cached and for how long is tough. Cache invalidation is one of the hard things in Computer Science. Ensuring that private data can only be accessed by its intended users is a security issue and must be handled very carefully when caching.