Tools We’ll Need
Several tools will be used to run the code in this blog post, including:
- A free Slack account with a team on which you have API access or sign up for the Slack Developer Hangout team
- Either Python 2 or 3
- Official Python slackclient code library built by the Slack team
- Slack API testing token
- Flask web micro-framework; if you’re unfamiliar with it, check out the Real Python course, the Flask by Example series, or Full Stack Python’s Flask page
It’s also handy to have the Slack API docs open for reference. You can follow along by writing the code in this post or clone the companion GitHub repository with the finished project.
Now that we know what tools we need to use, let’s begin by creating a new virtualenv to isolate our application dependencies from other Python projects you’re working on:
$ mkdir slackapi
$ virtualenv venv
Activate the virtualenv:
$ source venv/bin/activate
Depending on how your virtualenv and shell are set up, your prompt should now look something like this:
(venv)$
Keep the shell open for now as we get our Slack access established via the official slackclient API helper library built by Slack.
Install the slackclient helper library into your virtualenv with pip:
$ pip install slackclient==1.0.0
Now that we have the helper library installed, we need to obtain a Slack access token for our team and account.
The Slack Web API
Head to the landing page for the Slack Web API:

Once you’ve signed in you can scroll down on the web API page where you’ll see a button to generate test tokens:
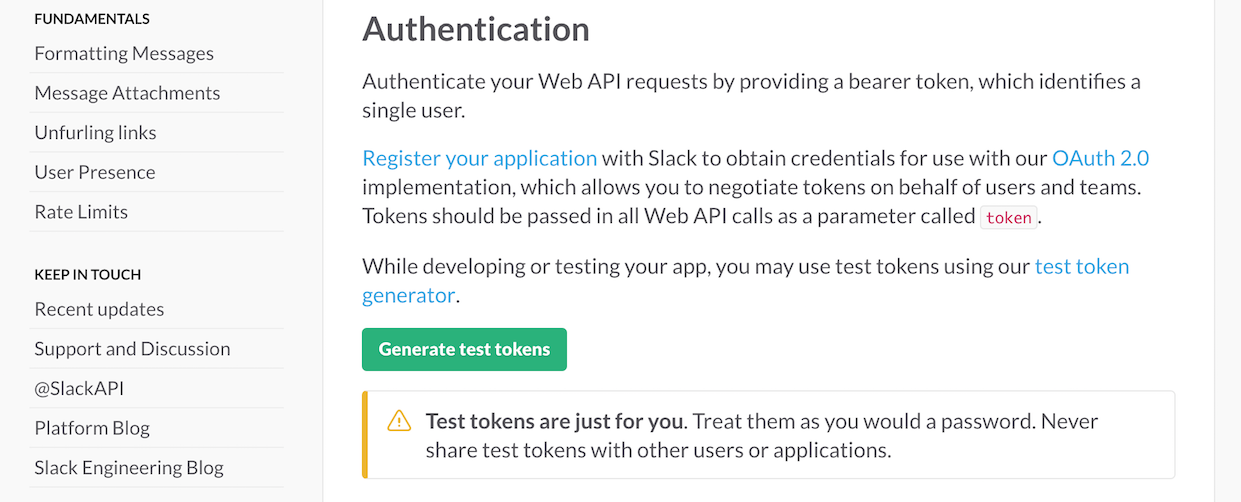
Generate a test token for a Slack team on which you have administrative privileges. This token will serve fine for our development purposes in this blog post, but you can also create an OAuth flow where other users can generate tokens for authentication through their own accounts.
We’ll need that test token in just a moment, so keep it handy. Let’s switch into our Python environment set up so we can try out the API. With your virtualenv still active, fire up the Python REPL:
(venv)$ python
Python 3.5.0 (v3.5.0:374f501f4567, Sep 12 2015, 11:00:19)
[GCC 4.2.1 (Apple Inc. build 5666) (dot 3)] on darwin
Type "help", "copyright", "credits" or "license" for more information.
>>>
Let’s test our API token with a test call; type the following code at the REPL prompt:
>>> from slackclient import SlackClient
>>> slack_client = SlackClient('your test token here')
>>> slack_client.api_call("api.test")
The REPL should return back something like the following dictionary if your API test with the token was successful:
{u'args': {u'token': u'xoxp-361113305843-7621238052-8691112296227-d0d4824abe'}, u'ok': True}
If you get back
{u'ok': False, u'error': u'invalid_auth'} then double-check that you copied the Slack token correctly into the second line entered on the REPL.
Enter one more quick test for our authentication with another line of code in the REPL:
>>> slack_client.api_call("auth.test")
You should see another dictionary similar to this one:
{u'user_id': u'U0S77S29J', u'url': u'https://fullstackguides.slack.com/', u'team_id': u'T0S8V1ZQA', u'user': u'matt', u'team': u'Full Stack Guides, u'ok': True}
Awesome! We’re authorized to start using the Slack API through our account. Now the fun begins as we can start programmatically obtaining Slack data and handling messages!
Slack API Basics
Exit out of the REPL with a quick CTRL-d or
exit() command. Back on the command line, export the Slack token as an environment variable:(venv)$ export SLACK_TOKEN='your slack token pasted here'
We’ll snag the environment variable in our Python script using the
os module instead of hardcoding it into the source code.
Dive into your favorite text editor such as Vim, Emacs, or Sublime Text so we can cut some new Python code. Create a new file named app.py and start filling it out with the following imports:
import os
from slackclient import SlackClient
Again, the
os module will be used to pull the SLACK_TOKEN environment variable we just exported. The SlackClient import should look familiar, as it is the same line we wrote earlier on the REPL:SLACK_TOKEN = os.environ.get('SLACK_TOKEN')
slack_client = SlackClient(SLACK_TOKEN)
In the above two lines, we snag the
SLACK_TOKEN environment variable value and instantiate the SlackClient helper library. Next let’s create a function to list channels via an API call. Slack returns back the results in a dictionary with two keys: ok and channels. okallows us to know if the API call was successful, and if its value is True then channelscontains the data we need on the list of channels.def list_channels():
channels_call = slack_client.api_call("channels.list")
if channels_call.get('ok'):
return channels_call['channels']
return None
Finally, let’s add a convenience main function that will allow us to print all the channels when we invoke the Python file with
python app.py on the command line:if __name__ == '__main__':
channels = list_channels()
if channels:
print("Channels: ")
for c in channels:
print(c['name'] + " (" + c['id'] + ")")
else:
print("Unable to authenticate.")
That’s all the code we need for the moment. Time to give it a try. Execute the script from the command line with
python app.py. You’ll see output like the following channels list:Channels:
general (C0S82S5RS)
python (C0S8HABL3)
random (C0S8F4432)
What is the channel ID that we printed out in parentheses next the the channel name for? Slack’s API needs a unique reference for channels, so we use the ID, not the name, as an identifier instead of the human-readable channel name.
We can write some code that uses the channel.info API method to obtain data for a specific channel based on its ID.
Add a new function along with a few new lines in main to output the latest message from each channel, which is only available in the more detailed
channel.info API call.
Updated code:
import os
from slackclient import SlackClient


SLACK_TOKEN = os.environ.get('SLACK_TOKEN', None)

slack_client = SlackClient(SLACK_TOKEN)


def list_channels():
    channels_call = slack_client.api_call("channels.list")
    if channels_call['ok']:
        return channels_call['channels']
    return None


def channel_info(channel_id):
    channel_info = slack_client.api_call("channels.info", channel=channel_id)
    if channel_info:
        return channel_info['channel']
    return None


if __name__ == '__main__':
    channels = list_channels()
    if channels:
        print("Channels: ")
        for c in channels:
            print(c['name'] + " (" + c['id'] + ")")
            detailed_info = channel_info(c['id'])
            if detailed_info:
                print(detailed_info['latest']['text'])
    else:
        print("Unable to authenticate.")
Note that with this code we’re greatly increasing the API calls the script executes, from one to N+1, where N is the number of channels returned back by Slack.
Run the new script again by executing
python app.py:Channels:
general (C0S82S5RS)
yada yada yada.
python (C0S8HABL3)
This is posted to #python and comes from a bot named webhookbot.
random (C0S8F4432)
<@U0SAEJ99T|samb> has joined the channel
Nice! Now we have both the list of channels as well as a way to get detailed information on each channel with its ID. Next let’s interact with other users in one of our channels by sending and receiving messages.
Sending Messages
We can go even further into the Slack API now that we know our API calls are working and have the channel ID. Let’s send a message to the #general channel.
Add a new function under
channel_info named send_message:def send_message(channel_id, message):
slack_client.api_call(
"chat.postMessage",
channel=channel_id,
text=message,
username='pythonbot',
icon_emoji=':robot_face:'
)
send_message takes in the ID for a channel, then posts a message from our “Python bot” to that channel. In addition, modify the main function so that when we run this file, main will call our new send_message function:if __name__ == '__main__':
channels = list_channels()
if channels:
print("Channels: ")
for channel in channels:
print(channel['name'] + " (" + channel['id'] + ")")
detailed_info = channel_info(channel['id'])
if detailed_info:
print('Latest text from ' + channel['name'] + ":")
print(detailed_info['latest']['text'])
if channel['name'] == 'general':
send_message(channel['id'], "Hello " +
channel['name'] + "! It worked!")
print('-----')
else:
print("Unable to authenticate.")
Save the changes and run
python app.py. Open the #general channel for your Slack team. You should see your Python bot post a new message to the channel:
Awesome! So we can send messages, but what about if we want to see what users in the #general channel are saying?
Receiving Messages
We can set up an outgoing webhook that will alert our Python application via an HTTP POST request. This part is a bit more complicated than sending messages because we need to receive one or more POST requests.
First we’ll need a simple web server that can handle an inbound POST request from the Slack webhook. Create a new file named receive.py with the following code:
import os
from flask import Flask, request, Response


app = Flask(__name__)

SLACK_WEBHOOK_SECRET = os.environ.get('SLACK_WEBHOOK_SECRET')


@app.route('/slack', methods=['POST'])
def inbound():
    if request.form.get('token') == SLACK_WEBHOOK_SECRET:
        channel = request.form.get('channel_name')
        username = request.form.get('user_name')
        text = request.form.get('text')
        inbound_message = username + " in " + channel + " says: " + text
        print(inbound_message)
    return Response(), 200


@app.route('/', methods=['GET'])
def test():
    return Response('It works!')


if __name__ == "__main__":
    app.run(debug=True)
In the above Python file, we:
- Import Flask
- Instantiate a new Flask application context
- Pull in the
SLACK_WEBHOOK_SECRETenvironment variable, which we’ll get in just a moment from the Slack console - Establish a route that can receive an HTTP POST request from Slack that prints the output to the command line as long as the webhook secret key sent to us matches the one from our environment variable
- Create another route for testing purposes that responds to a GET request
- Set our Flask app to run when we run this script with Python
Install Flask (
pip install flask), and then start the Flask app with the python receive.py command and we’ll see some debugging output indicating the development server is running.- Running on http://127.0.0.1:5000/ (Press CTRL+C to quit)
- Restarting with stat
- Debugger is active!
- Debugger pin code: 144-609-426
We’re set to receive our POST request webhook, except that most development environments do not expose routes beyond localhost. We need a localhost tunnel that will give us an externally-accessible domain name while we’re developing our code. I typically use ngrok since it’s easy, free and awesome. There are also other options such as localtunneland forward.
After downloading and running ngrok (or another localhost tunneling tool) in a new terminal window, you’ll get a subdomain that forwards requests sent to that subdomain over to your localhost server. Here is what ngrok looks like in the console when it’s started with the
./ngrok http 5000 command:
Take note of your Forwarding URL, in this case
https://6940e7da.ngrok.io, as we’ll need that for Slack to set up our outgoing webhook. Then test that our ngrok forwarding URL is properly connected to our Flask app by opening your web browser and going to the Forwarding URL. We should see the “It works!” message.
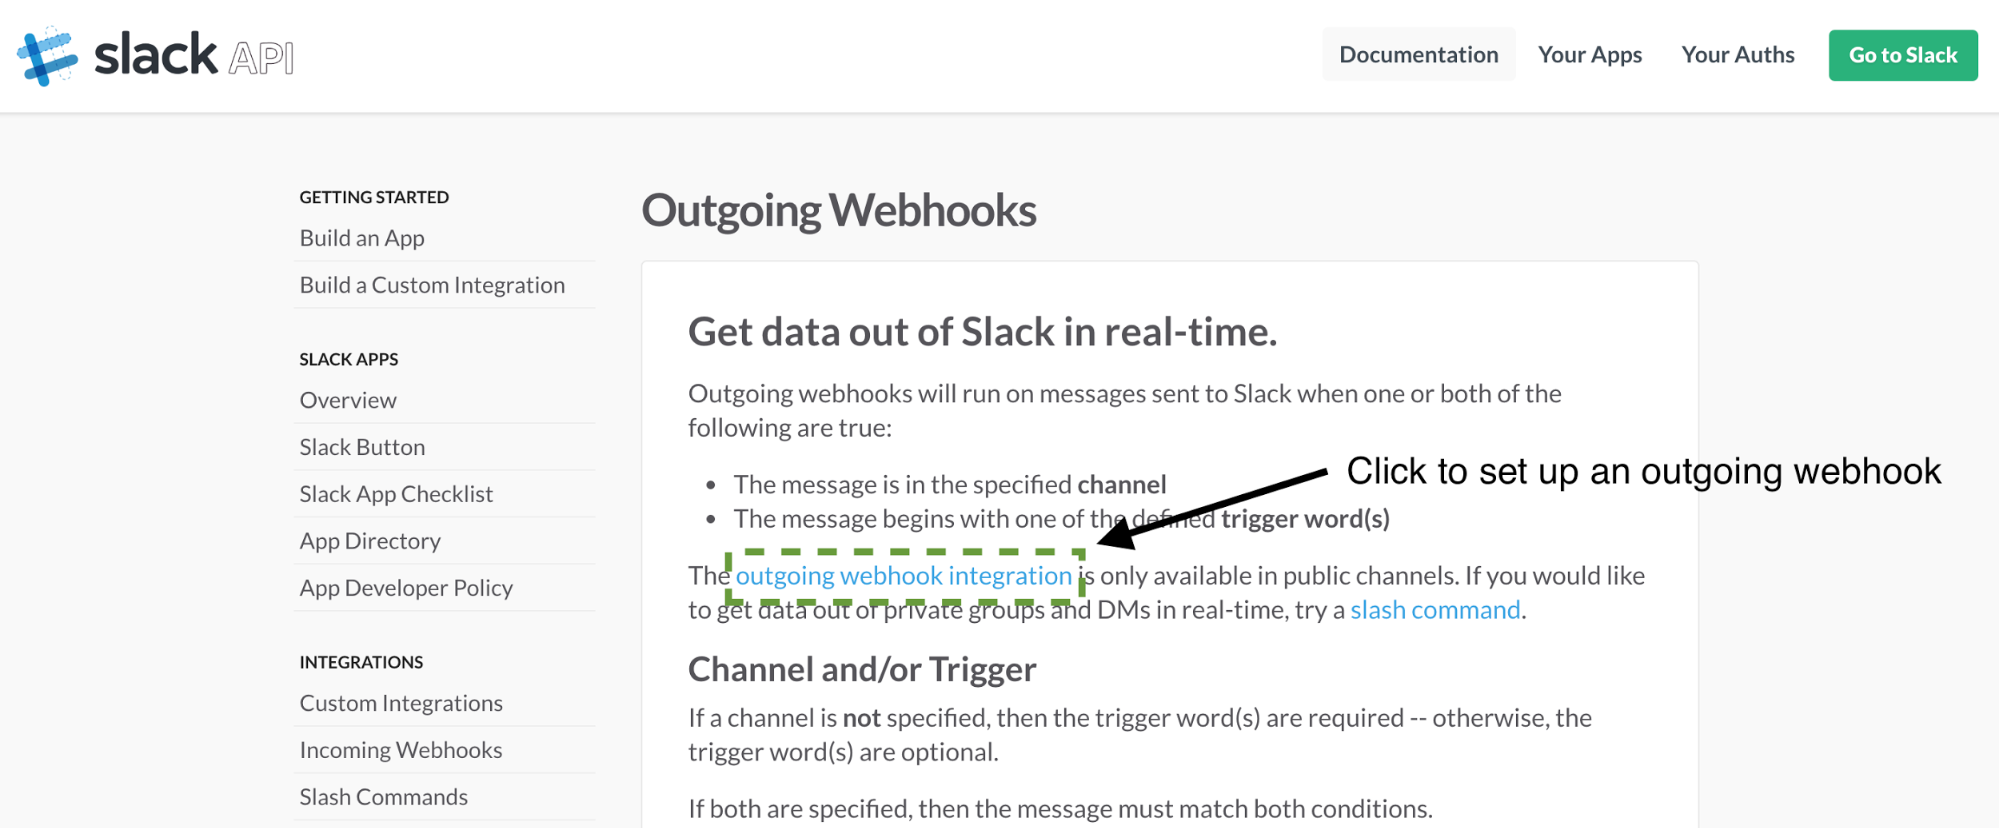
Now we can use that ngrok Forwarding URL in our Slack configuration. Go to the Slack Outgoing Webhooks page, then click the “outgoing webhook integration” link as shown below:
Scroll down to the Integration Settings section. Select “#general” as the channel to listen on. Copy your ngrok Forwarding URL plus “/slack” into the URL(s) text box:
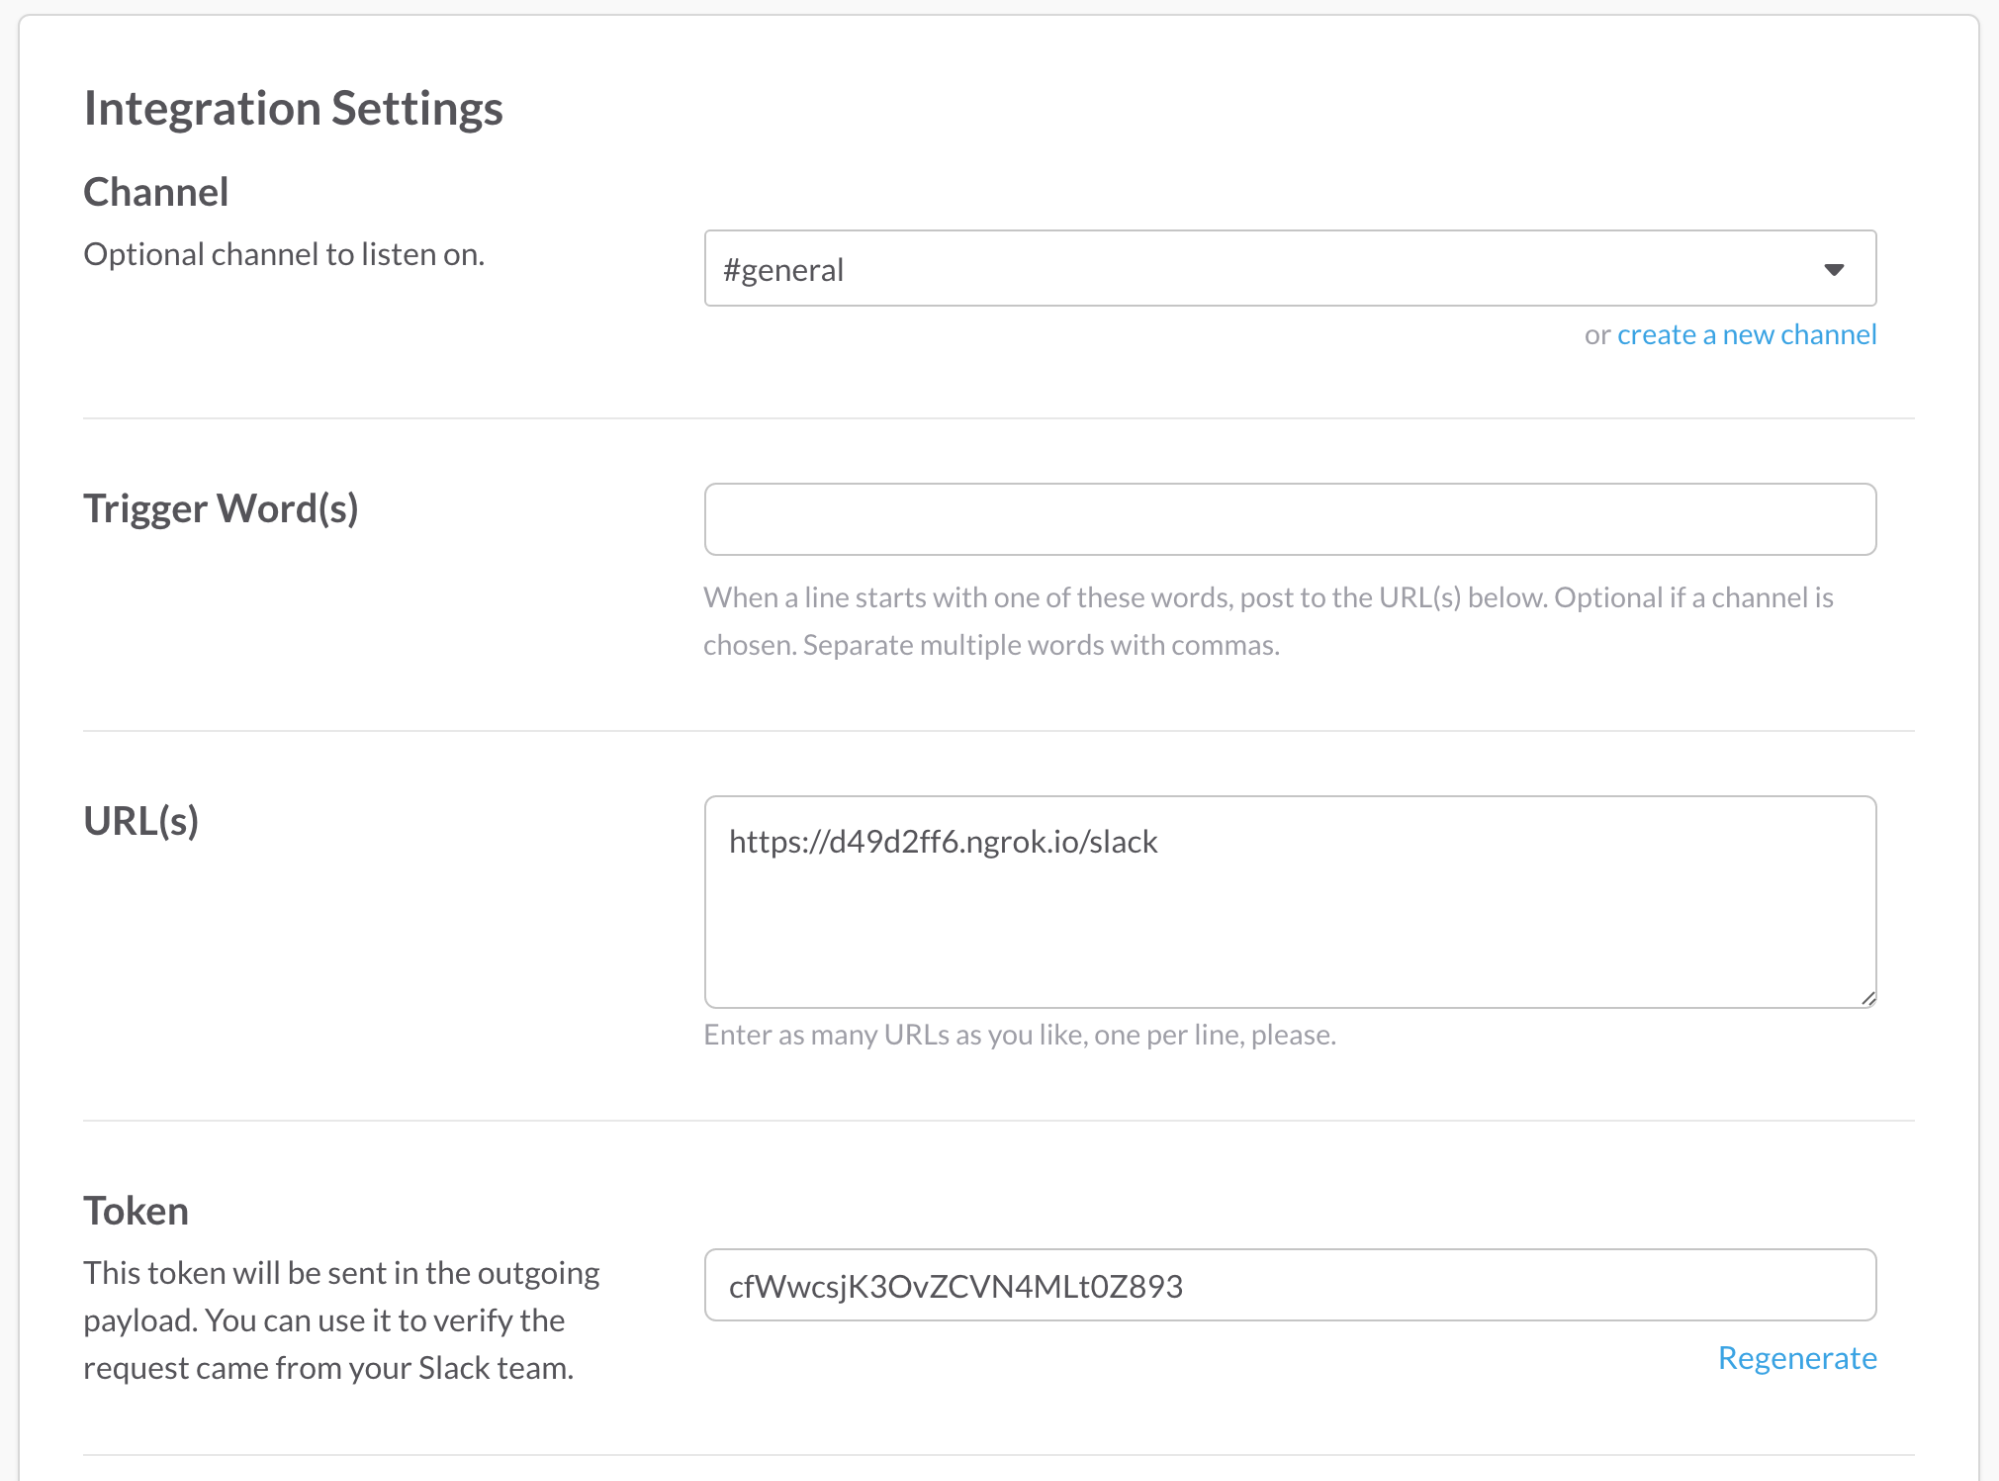
Copy the generated Token. Scroll down and press the “Save Settings” button.
Stop your Flask server for just a moment. As we did earlier with the Slack token, use the
export command to expose the outgoing webhook token as an environment variable:(venv)$ export SLACK_WEBHOOK_SECRET='generated outgoing webhook token here'
Then restart your Flask server so it can grab the generated
SLACK_WEBHOOK_SECRET. Finally, it’s time to test out receiving messages!
Go to your Slack #general channel. You should see that the outgoing webhook integration has been added to the channel:

Within Slack, type in a message like “testing” and hit enter. Go back to the command line where your Flask app is running. You should see the message output printed from the POST request:
matt in general says: testing
127.0.0.1 - - [21/May/2016 12:39:56] "POST /slack HTTP/1.1" 200 -
Now we’ve got a way to receive messages from one or more channels and can add whatever Python code we want to handle the input. This is a great hook for building a bot or sending messages to another service for processing.
Wrapping it up
Woohoo! All done! Well actually, there’s a whole lot more you can do with the Slack API. Here are several more ideas to try out now that you’ve got the basics down:
- Combine the Twilio API to communicate with Slack channels via text messages
- Try a different Slack client or ditch the helper library entirely and use the Requests library to implement retry logic
- Write and customize a full Slack bot